How to Set Up Zoobly on Android Devices?
Hello Zoobly parent 👋
We’re so glad you’re here! This guide will walk you through the steps to set up Zoobly on your child’s Android device, so their time online becomes a space for safe discovery, balance and joy.
1. Before You Begin
A little preparation goes a long way. Please make sure you:
- Create a Zoobly account from the parent app or the Zoobly website.
- Keep your child’s Android device charged up and ready, so the setup flows without interruptions.
- Ensure the device is connected to WiFi or mobile data.
- Disable Google Family Link for your child’s Gmail account.
2. Install Zoobly on the child’s device
- Open the Google Play Store on your child’s Android device.
- Search for Zoobly and tap Install.
- Once installed, open the app to begin setup.
3. Login and choose who uses the device
Zoobly can protect dedicated child devices and parent/child shared devices. Selecting the right role makes sure Zoobly protects the device just the way you need.
- If the device is shared, select Both (Shared Device).
-
If it’s only used by your child, select Child.

On shared devices, after Zoobly is set up on the device, parents can create a switch PIN (we’ll show you in Step 7) to easily switch between Parent Mode and Child Mode.
Now, login with your Zoobly account credentials.

Accept the prompts and select the child who uses the device. This links the device to your Zoobly account.

4. Grant necessary permissions
Zoobly will now request five key permissions. These help apply your settings from your Zoobly account on the child’s device to keep your child safe.
Rest assured, Zoobly only uses these permissions for protection and doesn't have access to your personal data.

-
Step 1: Accessibility: This permission helps Zoobly identify and block apps you restricted for your child.
Tap Allow > Downloaded apps > Select Zoobly > Toggle On Zoobly > Allow > Go back.

-
Step 2: Internet filtering: Install Zoobly security certificate + VPN profile to allow Zoobly to filter internet content by following the steps below.
Tap Install > More security & Privacy > Credential Storage > Install Certificates from Storage > CA certificate > Install anyway > Choose Zoobly CA Certificate from downloads > Go back.

Allow Zoobly to create a VPN connection in the next step.

-
Step 3: Location: This allows Zoobly to access and share your child’s live device location with you on the Zoobly app.
Tap Permissions > Location > Select Allow all the time > Go back.

-
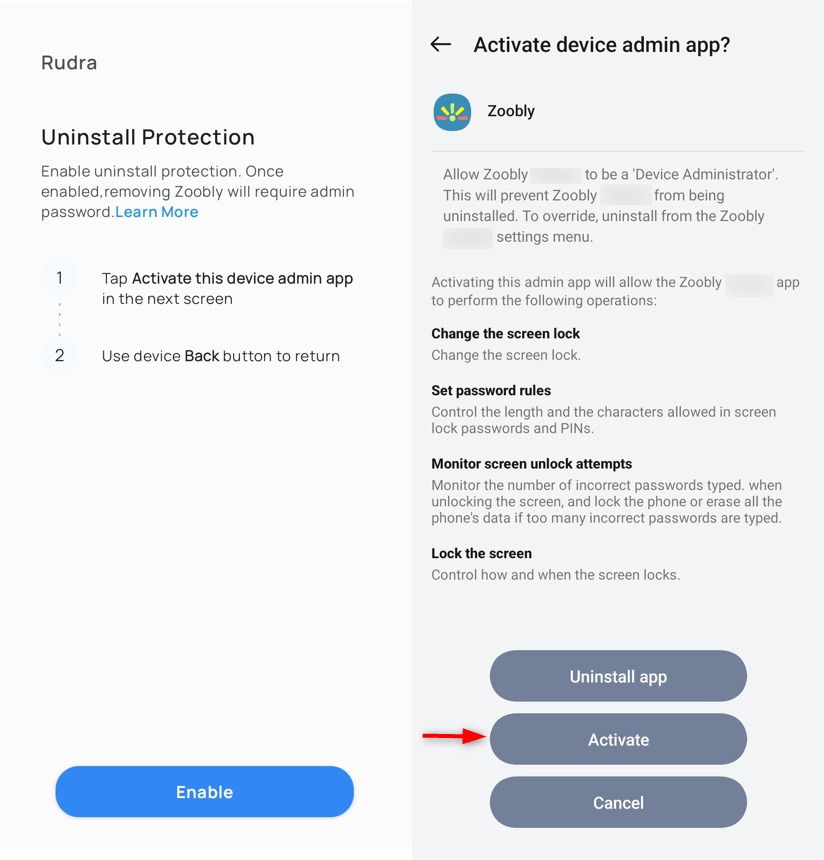
Step 4: Device Administrator Access: Allow Zoobly to be a device administrator and prevent Zoobly from getting uninstalled without your approval, so safeguards always stay active.
Tap Enable > Activate.

-
Step 5: Usage Access: Allow Zoobly to track screen time and the time spent on each app so you can view the screen time and apps usage on the parent dashboard.
Tap Enable Usage access > Select Zoobly > Toggle On Permit Usage access > Go back.

Once all five steps are complete, your child’s device is protected by Zoobly. The restrictions you have set up for your child on the parent account will now be enabled on the device.
5. Complete Setup
You’ll see a confirmation screen when the setup is successful. 🎉

6. That’s It!
Congratulations! Zoobly is now active on your child’s Android device.
Your child can view their activity summary and upcoming schedules in the Zoobly app on their device, while you manage everything from the parent app, without needing to access their device again.

7. Enable PIN for shared access:
If you’ve selected Both (Shared Device) in Step 3, follow the steps below to set up a PIN to switch between Parent Mode and Child Mode.
Click Switch > Set Switch Lock PIN for Zoobly.
Optionally, you can enable biometric/fingerprint authentication for even smoother switching.

Parent Mode: Lets you use the device without restrictions.
Child Mode: Applies all the schedules and healthy boundaries you’ve set.
We hope you were able to set up Zoobly on your child’s device successfully. If you have any trouble, please reach out to the Zoobly Support Team.